Eager to test out your rain sensor now? This is a quick starter guide to help you familiar with your sensor.
- Open up the rain sensor’s dome with the 4 screws found at the bottom of the enclosure. Connect the power to P1 P2 (12V or 24V).
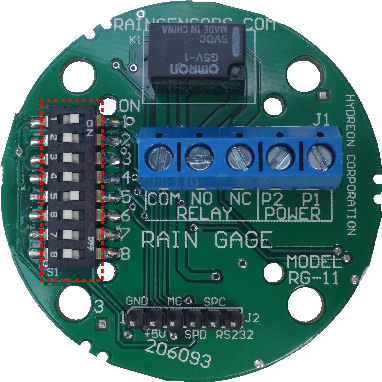
. - You can set to the DIP switches (to rain sensing mode) as illustrated on the right (DIP switch 1 = ON, switch 5 = ON).
. - Assembly back the rain sensor‘s enclosure.
. - Spray or dip some water on top of the rain sensor clear dome cover. You should see a tiny green light glow in the centre of the circuit board. This green light indicates that relay output is triggered by the water.
. - To test the sensor if it can detect a rain stop, just hold and wait for 2-3 minutes. You do not need to wipe off the water droplet on top of the sensor’s dome cover. You should see the green indicator light turn off after a period of about 2-3 minutes. This means that sensor has detected that the rain is stopped.
.
| Quick Setting for Rain/Water Detection | DIP Switch Settings | |||||||
| 1 | 2 | 3 | 4 | 5 | 6 | 7 | 8 | |
| Rain Detection (Sensitive) | 1 | 0 | 0 | 0 | 1 | 0 | 0 | 0 |
For a more refined rain detection settings, please check out this sensor operation settings page “Mode 1 – Rain Sensing“.
This “Mode 1 – Rain Sensing” is the most popular and the simplest mode to use.
Go back to the main rain sensor page.